2.8. Using Virtual Private Network (VPN)
2.8.1. Generalities
Virtual Private Networks (VPN) provide encryption and authorization services. The VPNs work on a lower level of communication (OSI Layer 2/3) by establishing “virtual” (existing on the top of other networks) network, where all nodes have the illusion of direct communication with other nodes through TCP or UDP, which have IP addresses assigned in the virtual network space, see Fig. 2.15. The VPN itself communicates through existing underlying networks, but this aspect is not visible to the nodes; it includes data encryption, compression, routing, but also authentication of clients which may connect to the VPN. Wireguard is a major implementation of VPN, and is supported on many platforms, including Linux, Windows, Android and others.
Using VPN with MuPIF, the infrastructure must be set up beforhand, but clients can communicate in a secure manner without any additional provisions - it is thus safe to pass unencrypted data over the VPN, as authentication has been done already.
Note that all traffic exchanged between VPN clients will go through the VPN server instance; the connection of this computer should be fast enough to accommodate all communication between clients combined.

Fig. 2.15 VPN architecture
2.8.2. VPN Set-up
Since wireguard is realtively low-level VPN architecture, it is very flexible in terms of topology. MuPIF uses Star network topology.
Becoming a part of the VPN network comprises the following:
Obtaining Wireguard configuration from the central hub administrators (they coordinate IP address assignment to clients);
Ensuring that the VPN endpoint (the
Peer/Endpointentry in the config file) is reachable from your machine (it runs at a dedicated port, so ensure your local network is not blocking outbound traffic to that IP/port).Note
The node does not need to be reachable from outside, thus it is not necessary to open firewall for inbound traffic. The node establishes UDP connection to the hub, and it is kept open via periodic keep-alive packet from node to the hub (every 30s in usual configurations, via
Peer/PersistentKeepaliveoption).Deploying the configuration on the local node.
Windows: the configuration file can be imported straght into the Wireguard client.
Linux, two options:
the config file is copied into
/etc/wireguard/somename.conf(the name is arbitrary) and the VPN is started with sudo wg-quick somename (or started persistently with sudo systemctl enable –now wg-quick@somename.the config file is imported into NetworkManager via
sudo nmcli connection import type wireguard file configfile.confand subsequently the connection is saved persistently in NetworkManager and can be activated as other network connections. (You will need the wireguard module for NetworkManager installed for this to work)
Confirm that VPN connection works by pinging the central hub. The config file contains e.g. Address = 172.22.2.13/24; replace the last number by 1 and test ping onto the machine: ping 172.22.2.1. If the IP address is IPv6 (e.g. Address = fd4e:6fb7:b3af:0000::12/32), also replace the last number by 1: ping fd4e:6fb7:b3af:0000::1. If the ping responds, your VPN connection is working.
Whenever node connects to the Wireguard endpoint, the following happens:
The node is authenticated via its public key (stored in the hub);
New network interface is created on the node, with IP address as specified in the Wireguard config file.
Routing is established such that only VPN traffic is routed through the hub.
The node is sending periodic keep-alive packets to the hub (
Peer/PersistentKeepaliveoption) so that di-directional connection is always possible.
Warning
Do not install the same Wireguard configuration on multiple machines. Simultaneous connection to the hub would result in connection malfunction. If you need to connect several machines, request several Wireguard configurations.
2.8.3. Example of simulation scenario using VPN
The process of allocating a new instance of remote application is illustrated on adapted version of the local thermo-mechanical scenario, already presented in 7. Developing user workflows. VPN mode can be enforced by issuing commands with -m 2 at the end. Refer to examples/Example07-stacTM-JobMan-distrib.
2.8.4. Online Monitoring tool
To monitor the status of VPN network as well as status of the MuPIF infrastructure, an online monitoring tool has been developed. It is based on OpenVPN-monitor tool, which monitors the status of VPN server and connected VPN clients. It has been extended to display stats about status of MuPIF infrastructure. It shows the status of the nameserver, the list of registered jobManagers, their connection information and number of running tasks. The monitoring tool is accessible from any web browser running on a computer connected to the VPN network.
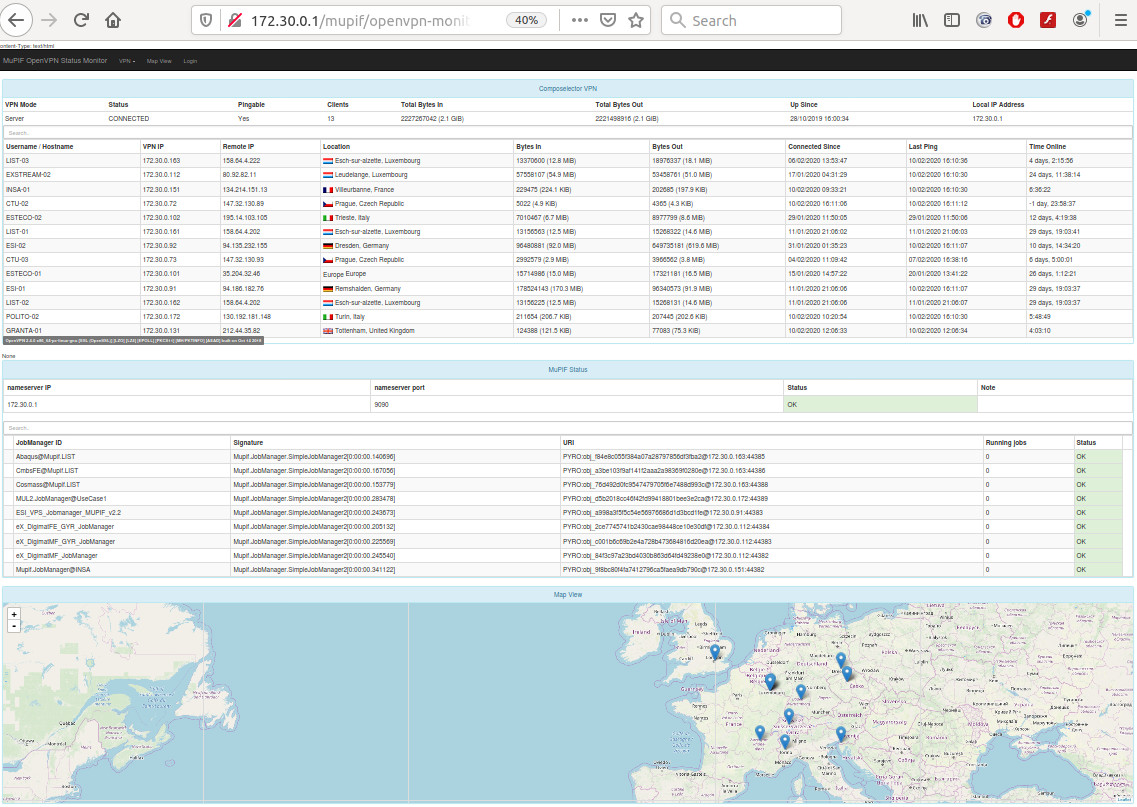
Fig. 2.16 Screenshot of VPN and platform monitoring tool